The Scream of the Motor and the Sting of Splinters
The high-pitched scream of the motor finally settles into a low, vibrating hum as the blade spins down to a halt. Fine sawdust drifts through the cold garage air, settling lightly on the scuffed toes of your work boots. You reach out and brush away the debris from the edge of your fresh cut, and there it is—that immediate, sinking feeling in your chest. The top veneer of your ninety-dollar sheet of Canadian maple plywood looks like it was chewed by a feral animal. Jagged splinters point upward, ruining the clean, crisp edge you desperately needed for your weekend project. You held your breath, you followed the pencil line perfectly, but the wood fought back. It is a quiet, expensive frustration that makes you want to pack up your tools and call it a day.
The Myth of the Eighty-Tooth Fix
If you have spent any time browsing home improvement forums or talking to the staff at Canadian Tire, you have probably been told that the only way to achieve a glass-smooth cut on veneered plywood is to drop a significant chunk of money on a specialty finishing blade. The hardware store aisles are lined with intimidating circular saw blades boasting eighty, sometimes even a hundred teeth, housed in glossy packaging that promises perfection. But believing you are entirely dependent on premium steel is a costly trap. It assumes the tool is the problem, completely ignoring the physical reality of how wood behaves.
Think of wood grain like a bundle of tightly stretched guitar strings running parallel to each other. When a spinning blade hits them, it does not simply slice through the strings; it violently pulls and lifts them. Because a standard circular saw blade rotates upward, the teeth exit through the top of the wood, dragging those delicate veneer fibres with them. That lifting action is the root cause of the tear-out. Your current blade is not necessarily dull; it is just following the aggressive physics of the machine.
I learned the truth about this during a freezing November afternoon in a dusty Halifax workshop. An old-school finishing carpenter named Mac was building custom kitchen cabinets, working with a battered, heavy circular saw that looked like it had survived decades of abuse. Attached to it was a standard twenty-four-tooth framing blade—the kind you use for roughing out two-by-fours, not crafting elegant cabinetry. Yet, as I watched him work, his cuts on premium birch plywood were absolutely immaculate.
When I asked him about his secret, assuming he had somehow modified the motor or the baseplate, he just chuckled and wiped the pine sap from his hands. ‘You do not need to over-complicate the metal,’ he told me, leaning against his heavy workbench. ‘The saw is doing exactly what it was built to do. You just need to hold the wood together while it happens.’ He reached deep into his canvas apron and pulled out a battered roll of standard blue painter’s tape.
| Who You Are | Why This Changes Your Process |
|---|---|
| The Weekend Builder | Saves the budget by eliminating the need for expensive, single-use finishing blades. |
| The Apartment Upcycler | Reduces airborne dust and limits wasted materials when building in small living spaces. |
| The Budget Renovator | Allows standard framing tools to produce high-end, living-room-ready finishes. |
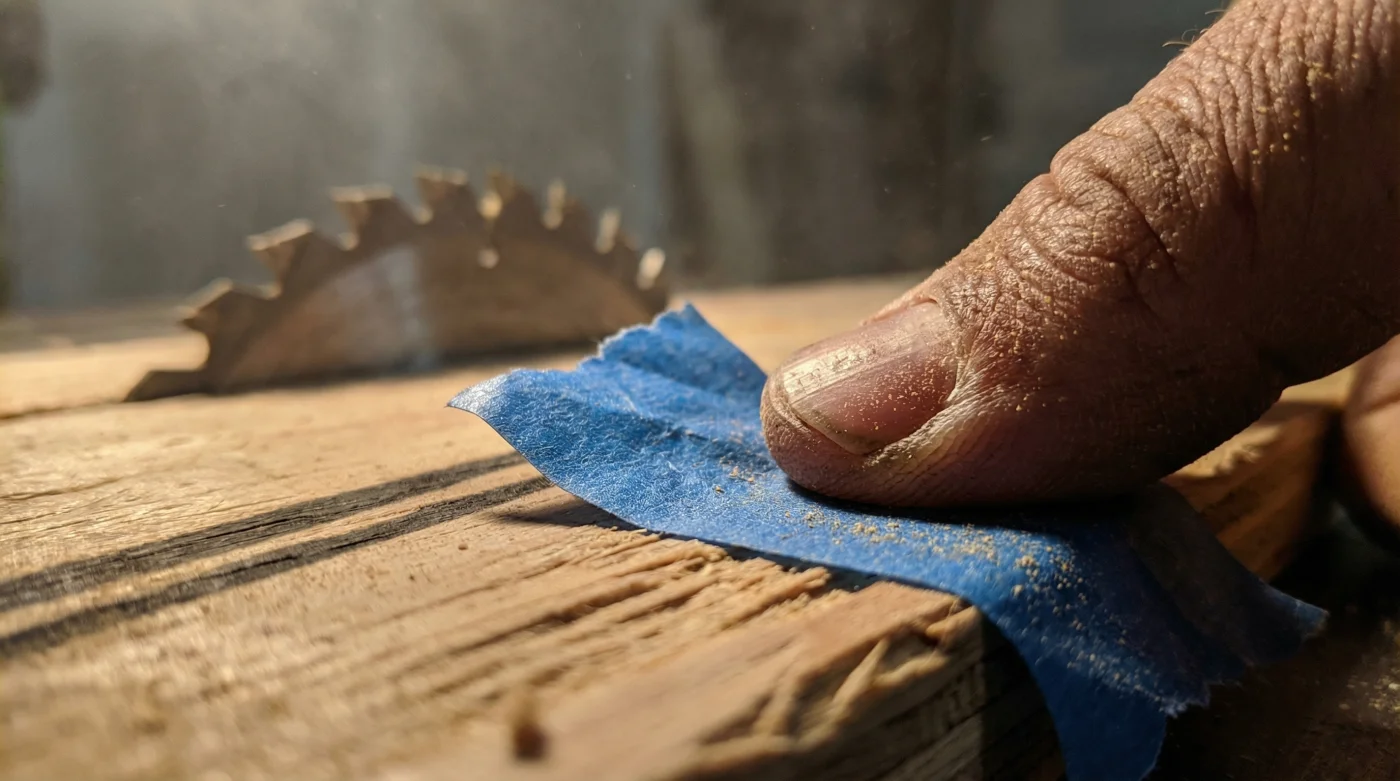
The Blue Tape Tension
The logic behind Mac’s trick is beautifully simple and incredibly effective. Plywood is an incredible feat of engineering, consisting of thin layers of wood glued together under immense pressure. But that top layer, the beautiful veneer you want to showcase in your home, is painfully thin. By laying a strip of blue masking tape firmly over your intended cut line, you are effectively creating an artificial, reinforcing skin on top of the delicate veneer. The adhesive holds those fragile wood fibres firmly in place, counteracting the aggressive upward lifting force of the saw teeth. Instead of blowing out, the fibres are trapped against the tape, forcing the blade to shear them off cleanly.
| Blade Dynamics | Without Tape | With Blue Masking Tape |
|---|---|---|
| Standard 24-Tooth Framing | Severe, jagged tear-out on top veneer. | Clean, factory-grade edge. |
| 60-Tooth General Purpose | Moderate fraying, requires heavy sanding. | Flawless finish, zero sanding required. |
| 80-Tooth Finishing | Minimal tear-out, but blade dulls rapidly. | Perfect edge, extends blade lifespan drastically. |
Mindful Mechanics
Applying this technique requires a slight shift in your daily rhythm, slowing down just enough to respect the materials. You begin by measuring your cut and marking the edges of the plywood just as you normally would.
Take your blue painter’s tape and lay a continuous strip exactly over the area where the blade will travel. Do not rush this step. If you are cutting a long sheet, lay it down calmly, section by section. If the tape wrinkles, pull it up and try again.
- Bathroom exhaust fans ignite ceiling insulation without this annual vacuuming routine.
- Landscaping river rocks cost pennies purchasing directly from local aggregate quarries.
- Popcorn ceilings hide completely beneath stretched canvas and temporary tension rods.
- Brass hardware restores perfectly using standard household tomato ketchup acid.
- Contaminated gasoline ruins winter snowblowers across Ontario rural storage sheds.
Next, take a sharp pencil and redraw your exact measurement line directly onto the blue tape. The slightly textured, matte surface of the painter’s tape holds graphite perfectly, giving you a highly visible, contrasting line to follow.
Position your circular saw at the edge of the board. Do not force the tool forward. Squeeze the trigger, let the motor reach its full speed, and let the natural weight of the saw do the work, guiding it smoothly over the blue tape. You will notice the saw feels slightly more grounded.
| The Tape Checklist | What to Look For | What to Avoid |
|---|---|---|
| Adhesive Strength | Medium-tack painter’s tape (blue or green). | High-tack duct tape (will peel the veneer itself). |
| Width | Two-inch width provides a wide safety margin. | Thin half-inch tape that barely covers the cut zone. |
| Texture | Matte paper finish that accepts pencil marks. | Glossy packing tape that smudges your cut line. |
The Bigger Picture of Craftsmanship
When the cut is finished and the blade goes quiet, the real magic happens. You take the edge of the blue tape and peel it back slowly, revealing a razor-sharp, flawless edge underneath. In that moment, something shifts in your perspective. You realize that true craftsmanship is not about owning the most expensive equipment in the neighbourhood or constantly upgrading your gear. It is about understanding the materials in your hands.
It is about empathy for the wood, knowing how it wants to behave, and supporting it through the harsh violence of the cut. This simple roll of adhesive tape saves you money, drastically extends the life of your everyday blades, and most importantly, preserves your peace of mind. Your weekend projects suddenly feel less stressful. You can build that custom shelving unit or that mid-century coffee table without the lingering dread of ruining your materials. You are no longer fighting the tools; you are working in harmony with them.
True mastery of your tools happens the moment you stop blaming the blade and start supporting the wood.
Frequently Asked Questions
Does the tape gum up the saw blade?
Not at all. Standard painter’s tape uses a low-residue adhesive that cuts cleanly without leaving sticky buildup on your blade teeth.Can I use standard beige masking tape?
You can, but blue or green painter’s tape is preferred because its adhesive is specifically designed not to lift the delicate top layer of wood when you peel it off.Do I put the tape on the top or bottom of the plywood?
Place the tape on the top surface. A circular saw blade cuts upward, meaning the tear-out almost always occurs on the side facing you.Should I peel the tape off immediately after cutting?
Yes, peel it back slowly at a sharp angle to ensure you do not pull up any stray fibres with the tape.Does this work with a jigsaw too?
Absolutely. Jigsaw blades are notorious for top-layer blowout, and the tape trick works flawlessly to keep those cuts clean as well.